10 ChatGPT Photo Editing Prompts You Can Copy and Paste
Upload a photo you already have. Paste one prompt. Get a better version of the same photo, with you still looking like you.
Ten copy-and-paste prompts for editing real photos in ChatGPT: better light, a clearer image, a tidier background, a new pose, outfit or setting, and a wider frame. Every one is written to keep faces, bodies and the rest of the photo as they were.
Free. No email required, nothing to download.
- Ten photo editing prompts, each with a one-tap copy button
- Real before-and-after examples, made with these prompts
- Prompts that protect faces, skin texture and body shape by default
- What to check before you post an edited photo
How to use them
These prompts edit a photo you already have, rather than making a new image from scratch. Each one does one job and tells ChatGPT what to leave alone, which is most of what stops an edit from changing your face.
Some have [brackets] to fill in, such as the new pose, outfit or setting. Replace the brackets and everything inside them with your own words.
- 01Open a new chat
Start fresh so nothing from an earlier conversation changes the edit.
- 02Upload your photo
Use the clearest, largest version you have. A screenshot of a photo loses detail before ChatGPT even starts.
- 03Paste the full prompt
Copy the whole prompt, fill in any brackets and send it.
- 04Ask for one change at a time
If something is off, say what to fix in a short follow-up, such as "keep the original hairline". Stacking several edits in one message is where faces start to drift.
The 10 prompts
Upload your photo, then paste the full prompt. The slash label is a memorable shortcut—not a built-in ChatGPT command.
Improve the photo while keeping you recognisable
Better light, colour and quality, with every face left as it is.
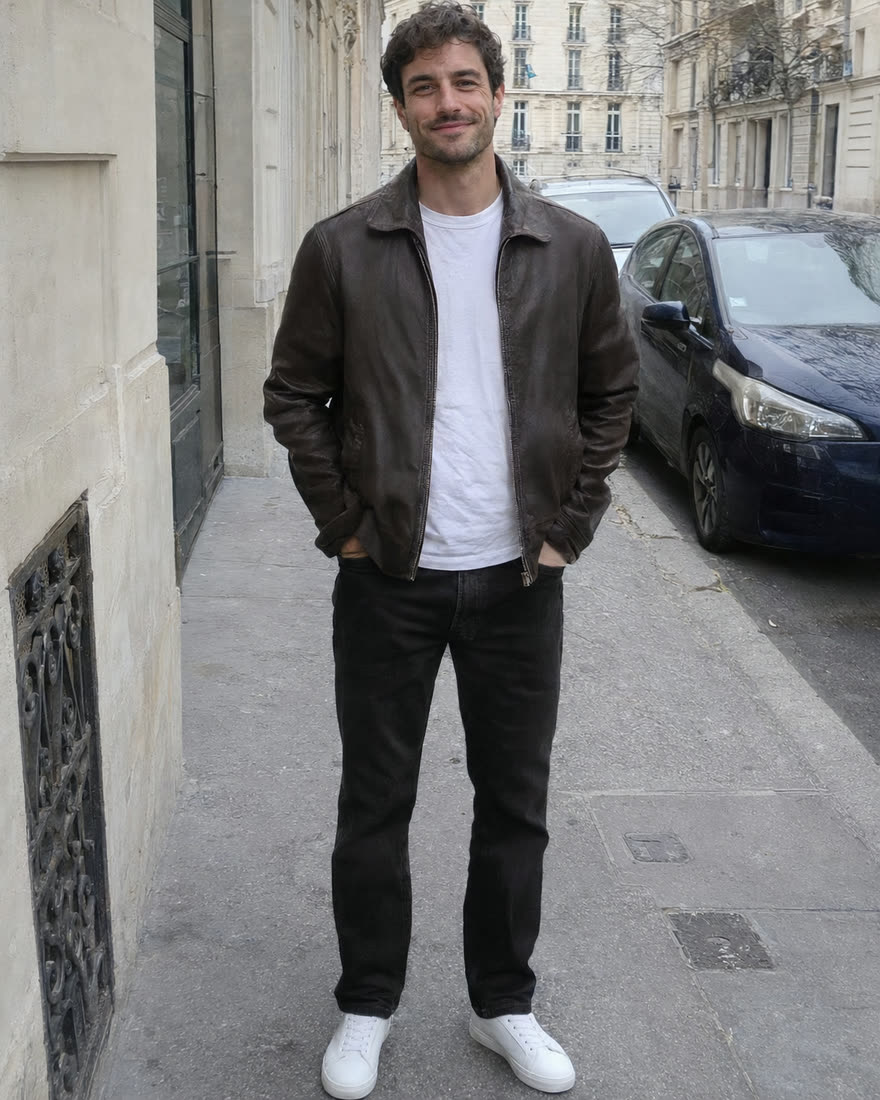
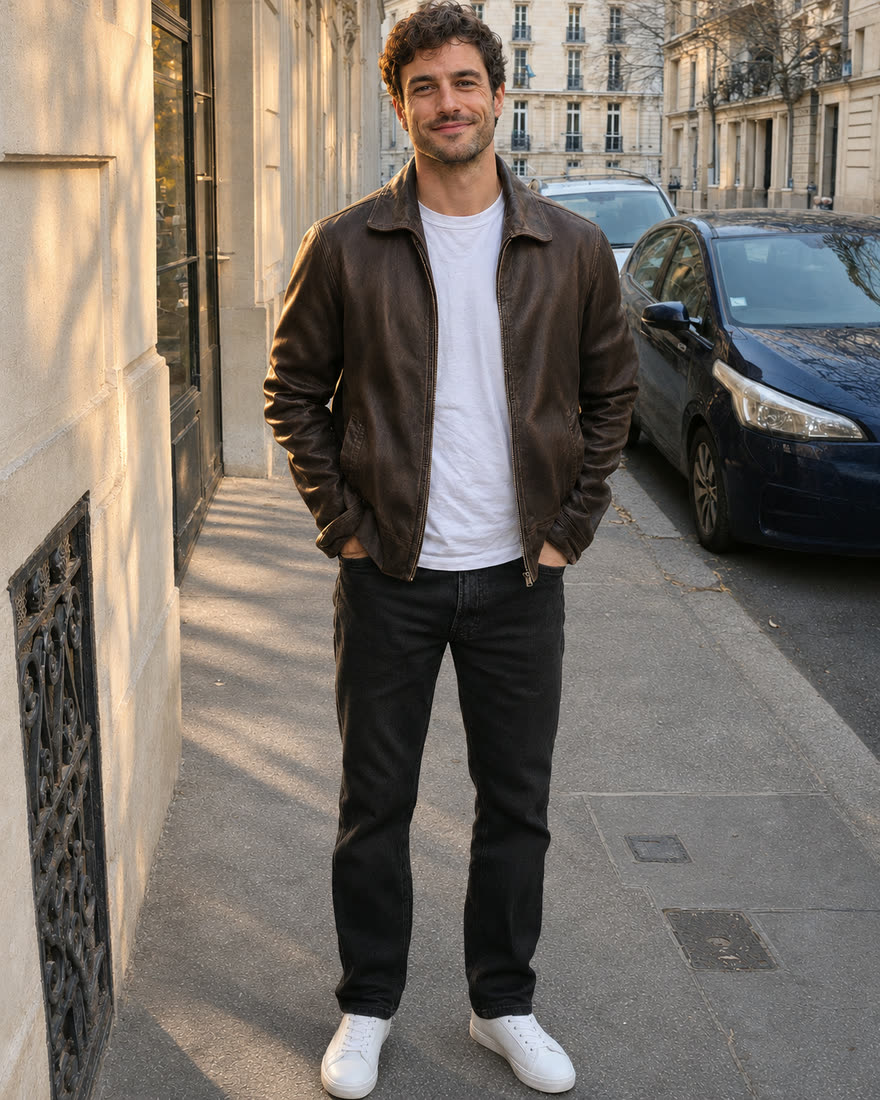
/identitylock

Edit the uploaded photo to improve its exposure, colour balance, contrast and overall photographic quality while prioritising the identity of every person pictured.

Preserve facial proportions, eye shape and colour, nose, lips, jawline, hairline, hairstyle, age, skin tone, expression and body shape. Keep natural skin texture and individual characteristics. Do not apply beauty filters, reshape features, slim bodies or make anyone look younger.

Keep the clothing, pose, background, camera angle and framing unchanged. Make restrained photographic improvements rather than redesigning the image. If an enhancement would require inventing facial detail, leave that area closer to the original.

Return one edited image with the original aspect ratio and no added text.
Give an ordinary portrait professional lighting
Soft key light, gentle fill and a little separation from the background, without a studio backdrop.
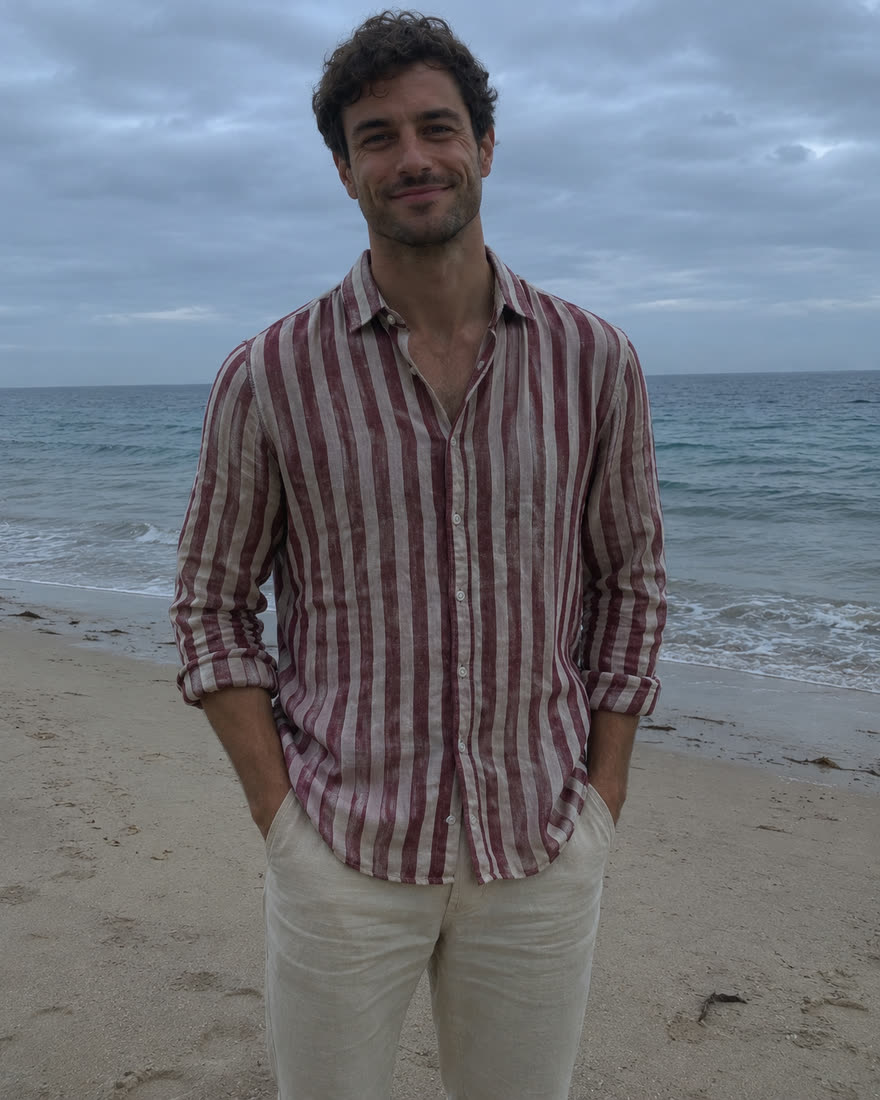
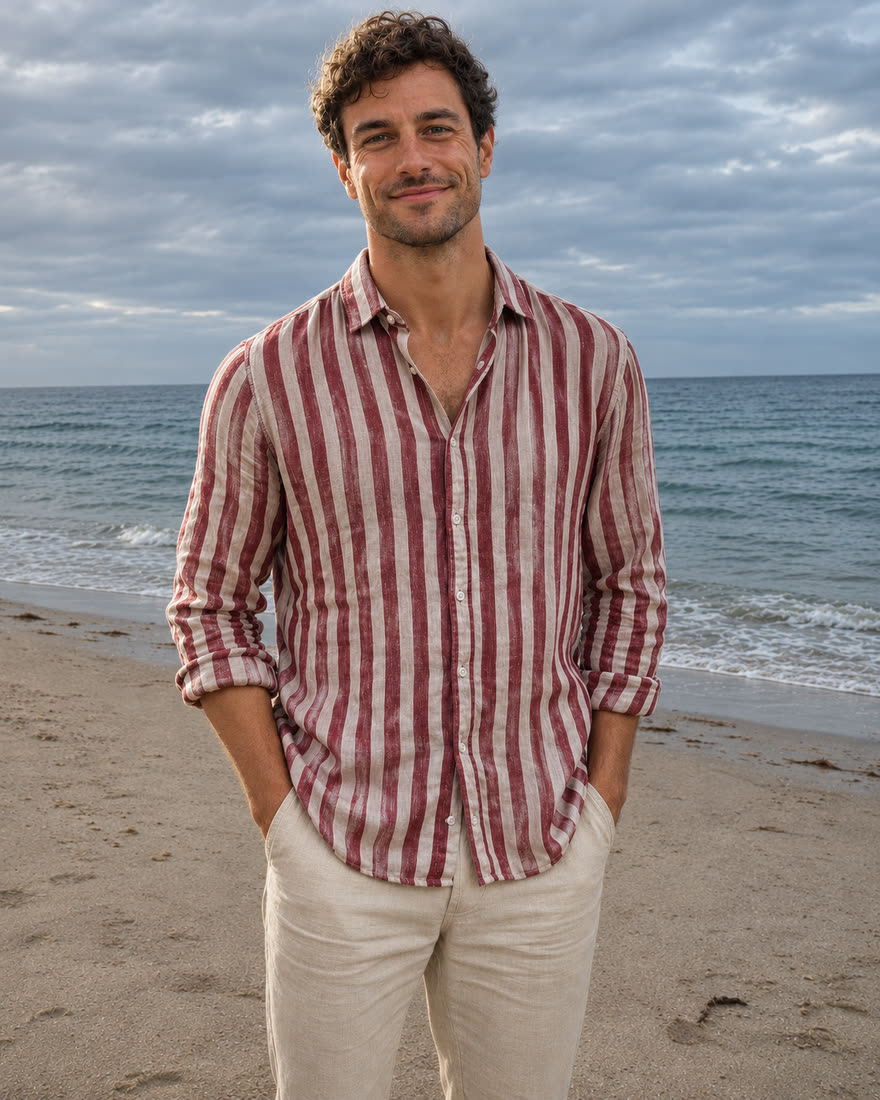
/studio-quality

Edit the uploaded photo to look professionally lit while keeping the original person, setting and composition.

Create the appearance of a large soft key light positioned slightly above and to one side of the camera, gentle fill light to soften deep facial shadows, and subtle separation between the subject and background. Correct poor exposure and unwanted colour casts while keeping skin tones believable.

Preserve the person's identity, expression, pose, clothing and body proportions. Retain pores, hair detail and fabric texture. Keep highlights controlled and shadows dimensional. Avoid plastic skin, excessive sharpening, artificial HDR or an obvious beauty filter.

Keep the existing background rather than replacing it with a studio backdrop. Return one edited image in the original aspect ratio without text.
Make a soft photo look clearer
Cleans up noise, compression and mild blur, conservatively.
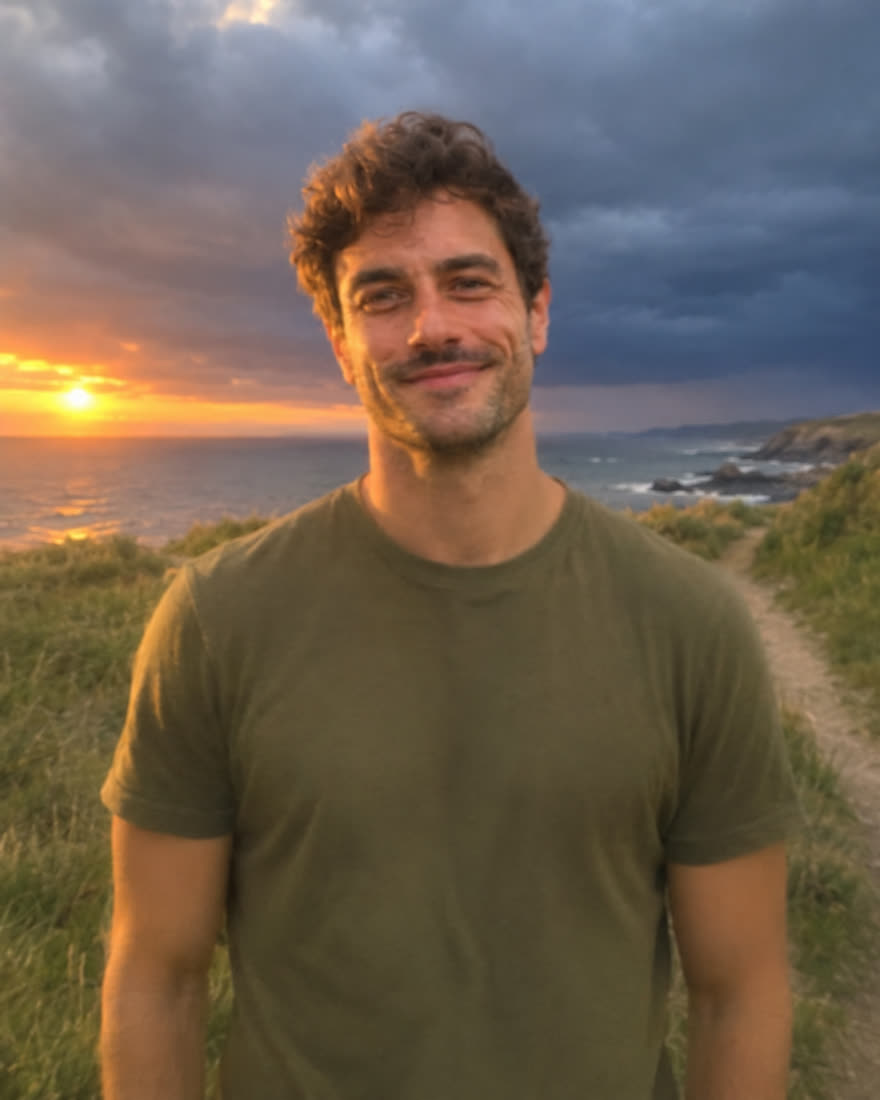
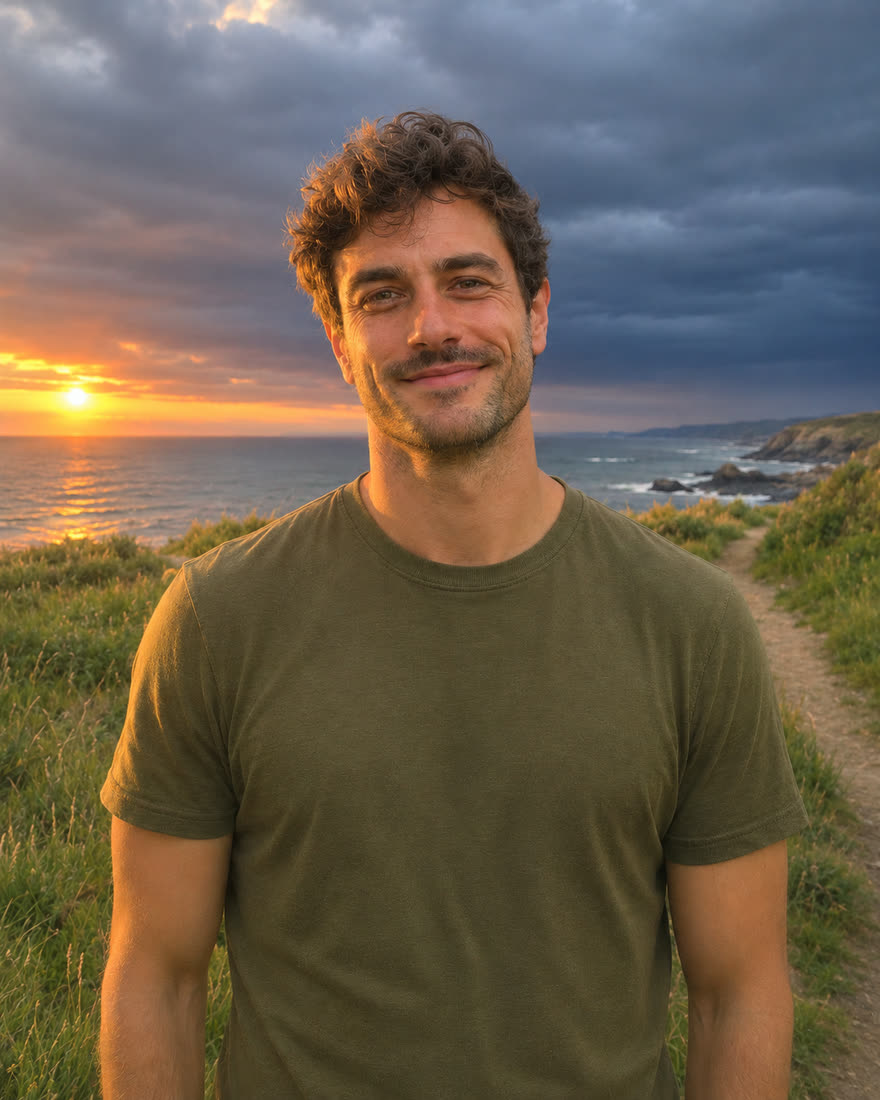
/upscale

Enhance the apparent clarity of the uploaded photo while staying as close as possible to its original content.

Reduce visible compression artefacts, distracting noise and mild softness. Improve edges and textures conservatively, especially around eyes, hair, clothing and important objects. Preserve the original faces, expressions, colours, lighting, framing and background.

Do not invent text, facial features, patterns or objects that cannot be confidently inferred. Keep ambiguous details subtle. Avoid sharpening halos, exaggerated pores, waxy skin and oversaturated colours.

Return the enhanced image at the highest available output resolution, keeping the original aspect ratio. Do not add captions or comparison panels.
About /upscale: generative enhancement can reconstruct detail. It doesn't reliably recover authentic missing detail or guarantee a larger pixel resolution.
Remove distracting background clutter
Tidies the mess behind you and keeps everything that belongs there.
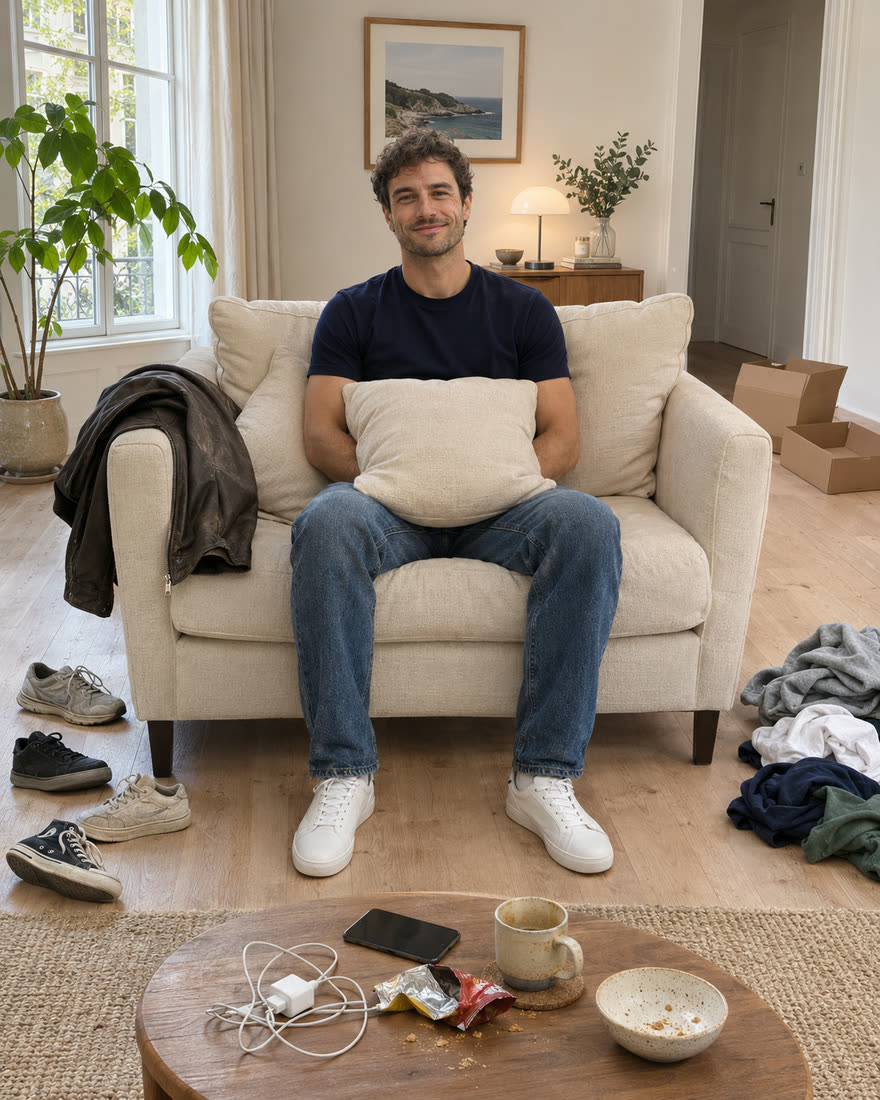
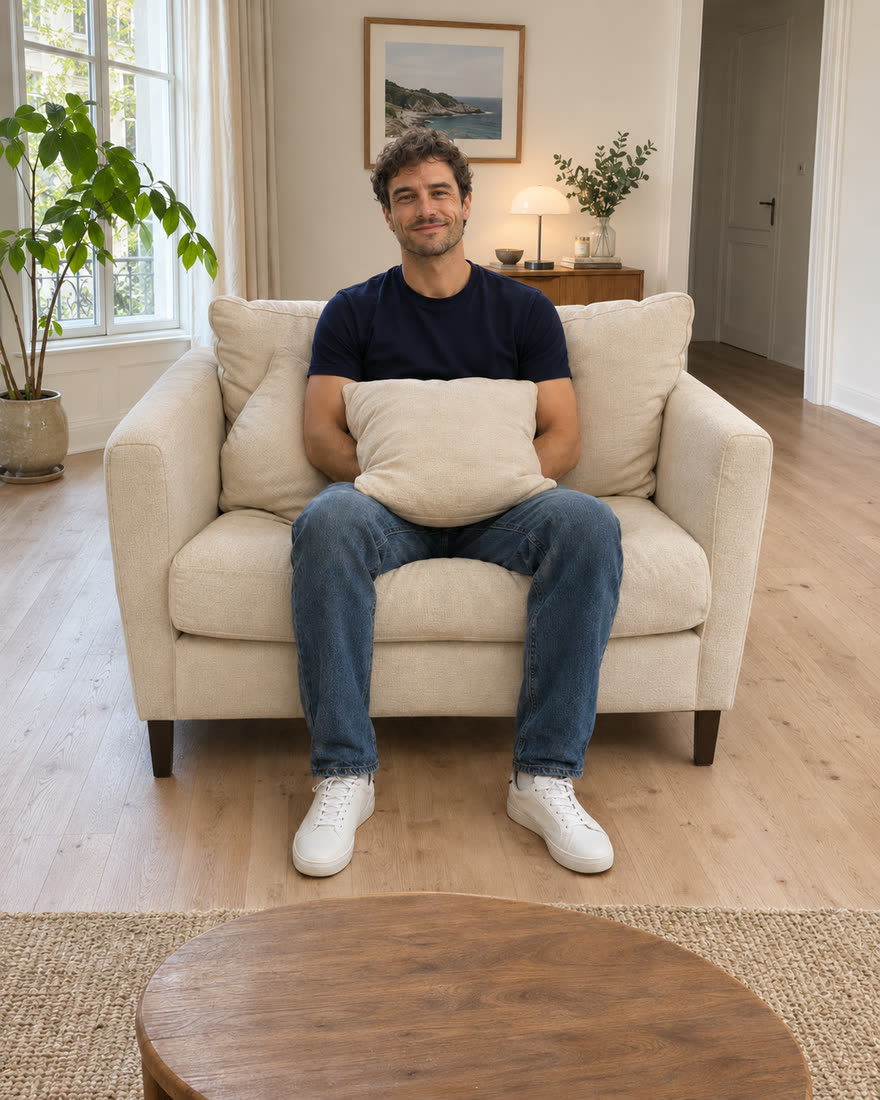
/clean-up

Clean up distracting clutter in the uploaded photo while preserving its main subject and original setting.

Remove obvious temporary distractions such as scattered rubbish, loose cables, discarded packaging and untidy piles in the background. Preserve furniture, architecture, intentional decor and anything the subject is wearing, holding or using. If an object's importance is ambiguous, keep it.

Reconstruct the exposed surfaces with consistent texture, perspective, lighting and shadows. Preserve all people, their faces, poses and clothing. Keep the camera angle, crop and depth of field unchanged.

Make the scene look naturally tidy, not empty or redesigned. Return one edited image with no text.
Change your pose without retaking the photo
Fill in the bracket with the pose you want. Everything else stays put.
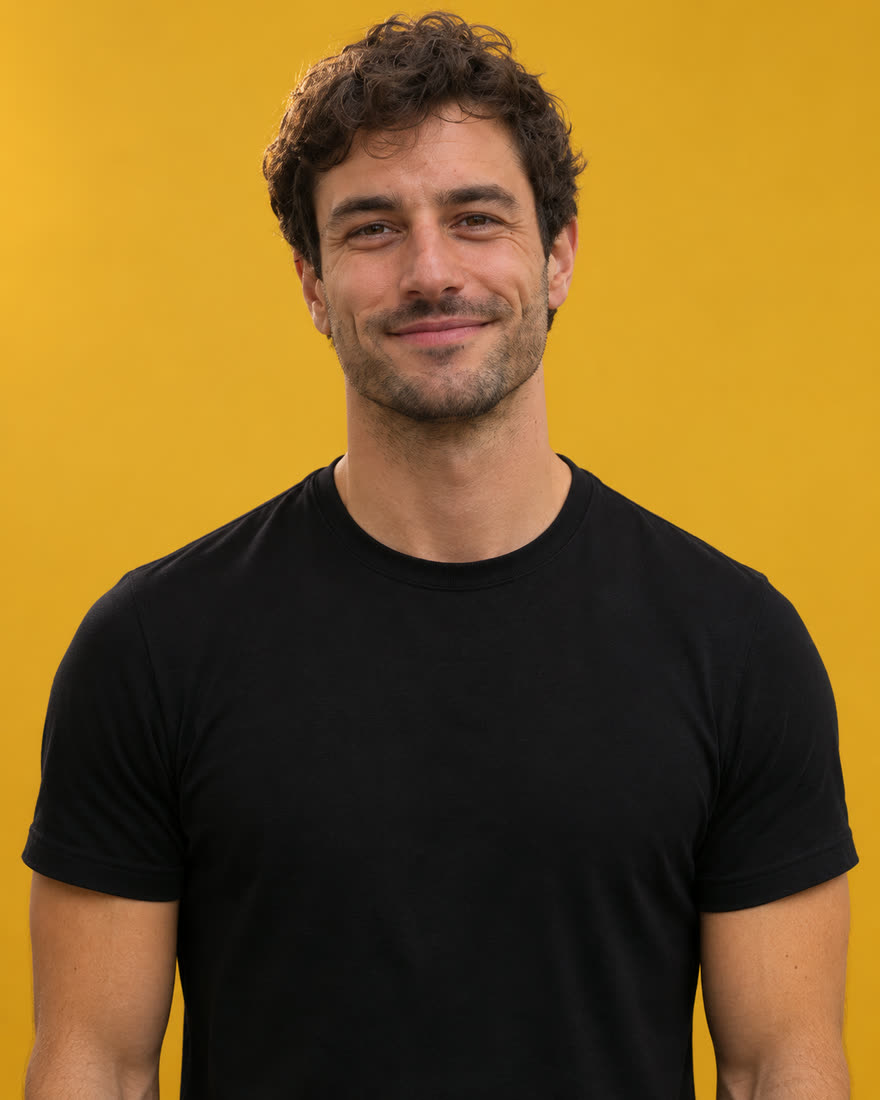
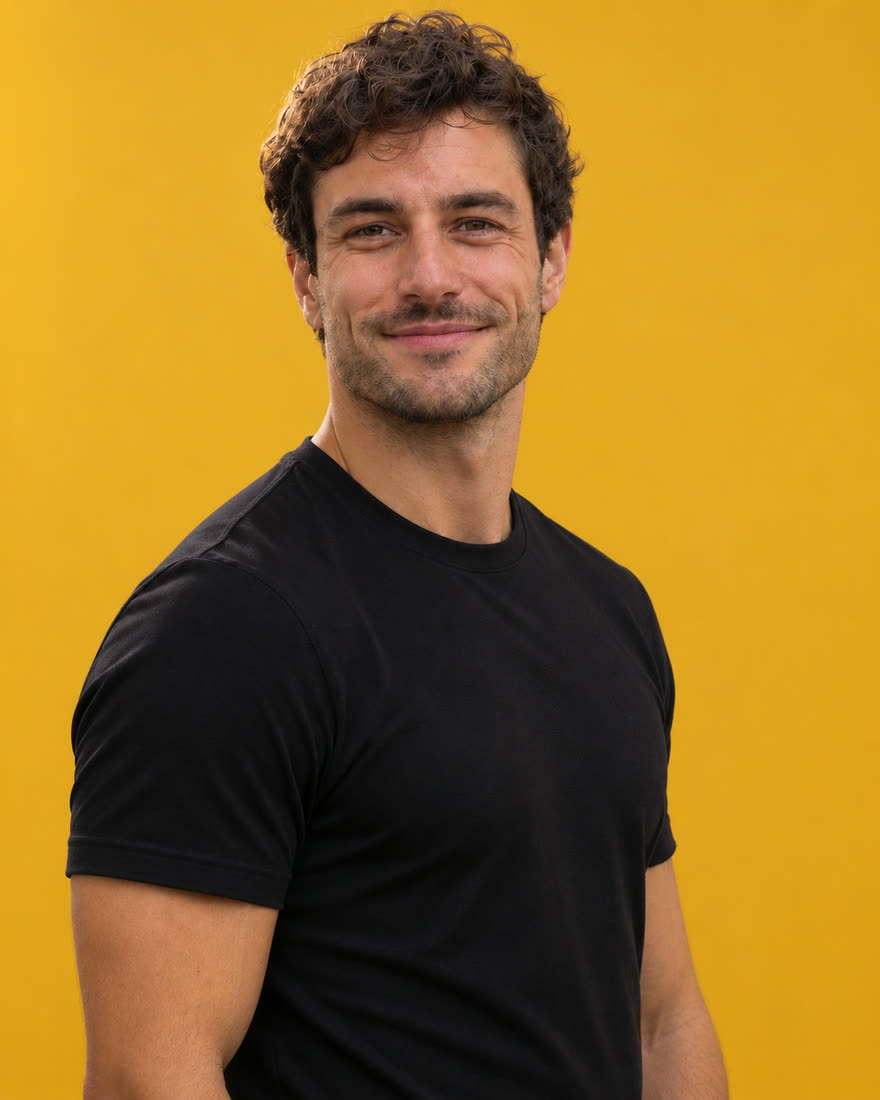
/pose-only

Change only the person's pose in the uploaded photo.

New pose: [describe the pose—for example, turn the torso slightly sideways while keeping the face looking towards the camera, with relaxed shoulders and arms].

Preserve the person's identity, facial proportions, age, skin tone, hairstyle, expression, body shape and clothing. Keep the same background, camera position, lighting, crop and overall photographic style.

Adjust clothing folds and shadows only where the new pose requires it. Keep shoulders, elbows, wrists, hands and legs anatomically plausible. Do not add props, accessories or extra limbs. Avoid extreme twisting or exaggerated posture.

Return one edited image in the original aspect ratio with no added text.
Remove one specific unwanted thing
Name the object or the person in the background, and where it is.
/remove-object

Remove only this element from the uploaded photo: [describe the object or background person and its location].

Keep everything else unchanged, including the main subject's face, body, clothing, pose and position. Do not crop the image to hide the unwanted element.

Reconstruct whatever should appear behind the removed element using the surrounding scene as reference. Match perspective, texture, lighting, depth of field and shadows. Remove any reflection or shadow belonging solely to the removed element, while preserving those belonging to other subjects.

Avoid repeated textures, smudged patches and visible editing seams. Return one edited image with the original dimensions or aspect ratio and no text.
Move your photo into a different setting
Describe the new setting. Light, shadows and scale are matched so it does not look cut out.
/background-swap

Replace the background of the uploaded photo with: [describe the new setting].

Preserve the foreground subject's identity, facial features, expression, hairstyle, clothing, body proportions, pose and scale. Keep fine edges such as hair, glasses and fabric clean and natural.

Make the new setting match the original camera height, perspective and depth of field. Match its lighting direction and colour temperature to the subject wherever possible. Add realistic contact shadows and reflections where needed so the subject feels physically present.

Do not redesign or beautify the subject. Avoid artificial cutout edges, halos and inconsistent scale. Return one cohesive photorealistic image in the original aspect ratio without text.
Give a flat photo warm evening light
Low, warm sunlight from one direction, not an orange filter.
/golden-hour

Relight the uploaded photo as if it were taken during natural golden hour.

Add warm, low-angle sunlight from one consistent direction, gentle highlights, soft ambient fill and believable shadows. Keep skin tones natural, preserve detail in bright areas and avoid covering the image with a uniform orange filter.

Preserve the identity, expression, pose, clothing and body proportions of every person. Keep the original setting, objects, camera angle and framing. Make only the lighting and colour changes needed for the effect.

If the sky is visible, warm it subtly without adding a dramatic replacement sunset. Avoid fake lens flare, glowing outlines and excessive saturation. Return one edited image without text.
Try a different outfit in the same photo
Describe the garments, colours, materials and fit. Your body and pose stay as they are.
/outfit-swap

Replace the person's outfit in the uploaded photo with: [describe the garments, colours, materials and fit].

Preserve their face, hairstyle, skin tone, expression, body shape, pose and position. Keep the background, camera angle and lighting unchanged. Do not alter their physique to fit the outfit.

Make the new clothing follow the existing body and pose naturally, with believable seams, folds, fabric weight, shadows and layering. Preserve hands and any objects being held. Keep existing accessories unless they directly conflict with the requested clothing.

Do not invent brand logos or change unrelated parts of the image. Return one realistic edited photo in the original aspect ratio with no text.
Turn a tight crop into a wider composition
Pick the shape you need, such as 9:16 for Stories or 16:9 for a banner, and where the subject should sit.
/expand-frame

Expand the canvas of the uploaded photo to [target aspect ratio, such as 9:16 for Stories or 16:9 for a website banner].

Preserve the original image area and keep the subject's face, body, pose, clothing and proportions unchanged. Add space primarily around the subject rather than enlarging or stretching them.

Extend the existing environment naturally, matching its perspective, architecture, textures, lighting, shadows and depth of field. Do not duplicate people, objects or repeating background features.

Place the subject [centrally / on the left / on the right], leaving useful empty space in [location]. Where the original photo cuts off body parts, prefer extending the surrounding background rather than inventing anatomy.

Return one expanded image without text, borders or watermarks.
One AI tool or system you can use, every week. Free. Get the newsletter →
Getting better results
- Got text back instead of an image? Add "Create this as an image." to the end of the prompt.
- Compare it with the original. Put the two side by side and check the eyes, teeth, hands, hairline and any writing in the photo. These are the details image models most often change.
- Face drifting after a few edits? Go back to the original photo in a new chat rather than editing the edit. Each round trip loses a little of the original.
- Only edit photos you have the right to. That means your own photos, or photos of people who have agreed. Do not use these to change how someone else looks without their OK.
- Be honest about the edit where it matters. A tidier background is fine for a profile picture. A removed object or a swapped setting is not fine in a property listing, a product claim or anything someone relies on as a record.
What you have now
Ten prompts that fix the photos you already have, instead of making you reshoot them. Start with /identitylock on your next profile picture: it is the safest of the ten, and it shows you quickly how much a restrained edit can do.
Common questions
- Are these real ChatGPT commands? No. The slash labels are shortcuts that make each prompt easy to find and remember. ChatGPT has no built-in /identitylock. The full prompt underneath is what does the work, so copy all of it.
- Why does my face look slightly different? Image models rebuild the photo rather than adjusting pixels the way a photo editor does, so small details can shift. These prompts ask it to preserve your features, but check the result against the original. If it has drifted, start a new chat with the original photo and run /identitylock first.
- Will /upscale make my photo higher resolution? Not reliably. It can make a soft photo look clearer, but any detail it adds is reconstructed rather than recovered, and the output size depends on what ChatGPT returns. For a print-size file, use a dedicated upscaling tool.
- Do these work outside ChatGPT? They are plain-English prompts, so they work in any AI tool that can edit an uploaded photo. Results vary between tools, and some follow instructions about preserving faces better than others.
- Can I use an edited photo for my business? Yes, for things like profile pictures, social posts and your website, as long as it is your photo or you have permission. Do not use edits that change the facts, such as a removed defect in a product photo or a swapped view in a listing.
Keep going
Want your team trained on this?
Tell us about your team and the tools you use, and we’ll reply within 48 hours with a training plan built around your real work.